An unofficial guide to the open source, off-grid, GPS mesh communicator.
![]() lets you use inexpensive (e.g. $30/board) GPS radios as extensible mesh communicators. It’s great for any hobby where you might not have reliable internet access. Each member of your mesh can see the location and distance of all other members and receive text messages sent to your private group chat. Data automatically forwards as needed, so everyone can get messages from even the furthest member. Josh Nass of Ham Radio Crash Course gives a great overview in this video.
lets you use inexpensive (e.g. $30/board) GPS radios as extensible mesh communicators. It’s great for any hobby where you might not have reliable internet access. Each member of your mesh can see the location and distance of all other members and receive text messages sent to your private group chat. Data automatically forwards as needed, so everyone can get messages from even the furthest member. Josh Nass of Ham Radio Crash Course gives a great overview in this video.

Secure
Messages are AES256 encrypted. Only radios you specify are be able to read your messages.

Long Range
Communicate kilometers between nodes. Internet-connected relay nodes can enable online conversations.

Low Power
Go for days on end on a single battery or extend it indefinately with a solar cell.

Open Source
Meshtastic software is open source and has a growing community of contributors

Platform Agnostic
Meshtastic clients are built or being built for all major desktop and mobile platforms.
Get Started
1. Select your hardware
If you’re comfortable soldering and want just the board I recommend the LILYGO® TTGO Meshtastic T-Beam V1.1 ( $27 – $30), which comes with Meshtastic pre-installed and an unattached OLED display. You just need to solder the display to the board, throw in a battery, and it’s ready to go!
If you want a kit with the board, screen already attached, battery, case, and everything assembled I’d recommend QuantumShadow’s Kit ($99).
Note: If you purchase a different board without Meshtastic installed, make sure to follow 7. Flashing & Updating Your Device to load it onto your board before you try connecting to it.
The Meshtastic team maintains their own list of recommended boards and details on each here. Here’s a brief overview of the current, common alternatives which they support:
- T-Beam V1.0 w/ NEO-M8N (Slightly better GPS) – $30.60
- T-Beam V0.7 w/ NEO-6M (No display) – $22.57
- TTGO LORA32 (No GPS) – $22.00
- Heltec LoRa 32 (No GPS – Built-in display) – $20.80
- T-Echo SX1262 (eInk display, battery, & enclosure) – $64.79
- WisBlock Meshtastic Starter Kit (modular) – $24.99 + Add-ons
Make sure to get the board frequency for your country:
- US / JP / AU / NZ / CA – 915MHz
- CN – 470MHz
- EU – 868MHz, 433MHz
A full list of LoRa frequencies per region is available here.
2. Get some batteries
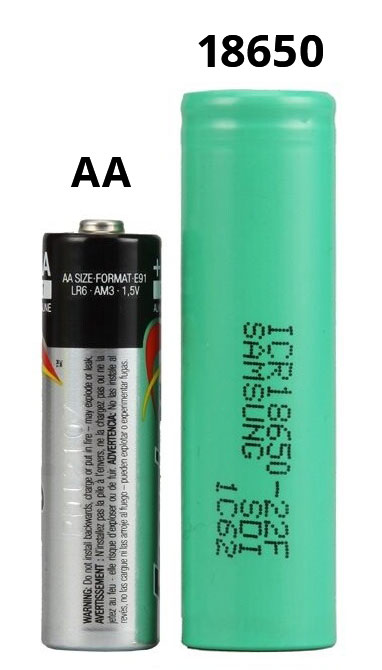
The T-Beam boards each require one 18650 battery. These are lithium-ion rechargeable batteries and slightly larger than AAs. You’ll be able to charge the battery with the board itself whenever you have it inserted and are powering it via-USB.
There are many reputable places to purchase 18650s. These are some known good manufacturers. For a quick recommendation, we suggest the Sanyo NCR18650GA 3500mAh.
CAUTION: Do NOT power on or operate your device without a connected antenna. Un-transmitted radio signals reflected back to the transmitter can damage the device.
3. Attach the display
If you purchased a T-Beam board with an OLED display you’ll need to solder it into place. This isn’t as difficult as it may seem if you’ve never soldered before. You just need access to a soldering iron and/or someone who’s familiar with one.
This image provides a quick-reference for which pins your OLED should line up with.
4. Install the app
Install the Android app on your phone so you can pair it to your board. Optionally, you can find out how to sideload the app or join the Android beta tests here.
The Meshtastic iOS app is currently available in TestFlight as a public beta with a projected App Store release in early 2022. There are plenty of remaining beta spaces available and there are no codes.
5. Connect to your board
Power on your board and then open the Meshtastic app on your phone. For the Android app you should your board appear in the list on the Settings tab. If you select it, a bluetooth notification will appear and a code will be displayed on the board’s screen. Once you input this code you should be connected and able to set your screen name in the Connection tab.
The green UPDATE button may appear if there’s an update for your board’s firmware. You can press it to try updating it via bluetooth through your phone. If this doesn’t work, you may need to update/flash it by connecting it to a PC with a USB and following the steps in 7. Updating & Flashing Your Device.
6. Grab a case
Your exposed board will seem somewhat fragile in practical applications. Thankfully, the community has been creating a variety of 3D-printed solutions for various boards. You can visit the ongoing 3D-printed Cases thread on the forum for the latest updates and options. Some common solutions are listed below. Make sure to double-check they’re compatible with your board.
QuantumShadow’s Cases
Additional Cases
(Specifically for 1.3″ OLED displays)
7. Flashing & Updating Your Device
You will need to flash your board with a PC if it does not come with Meshtastic pre-installed or you have issues updating it via bluetooth. You’ll need to download the Meshtastic Flasher here for either Windows, Mac, or Linux. This page contains the most up-to-date instructions on using the software.
Flasher Walkthrough for Windows
1. Download and install the latest version of Python. Here’s a quick link to the 64-bit version. Here’s their confusing list of all the other versions.
2. Connect your board to your PC via USB. It should automatically power on.
3. Download and install the Meshtastic Flasher (meshtastic-flasher-win.zip) for Windows. You need to unzip the zip and run meshtastic-flasher.exe. It will download and setup a bunch of packages.
4. You should eventually see a window with the Meshtastic logo appear. Select GET VERSIONS.
5. Select DETECT DEVICE.
6. If it detects your device correctly, then you can select FLASH. If it doesn’t, you’ll have to manually select it from the Device dropdown.
7. Watch the magic happen in a new window as it flashes your board.
8. Assuming it was a success, your device should now appear inside your mobile app and you can follow step five to connect to it. Start meshing!
8. Add your node(s) to the  Map
Map
This is an unofficial map for finding other Meshtastic users, nodes, and repeaters. It’s great for letting others know about your network and collaborating on how to build it out.
9. Learn how to share the Meshtastic app offline
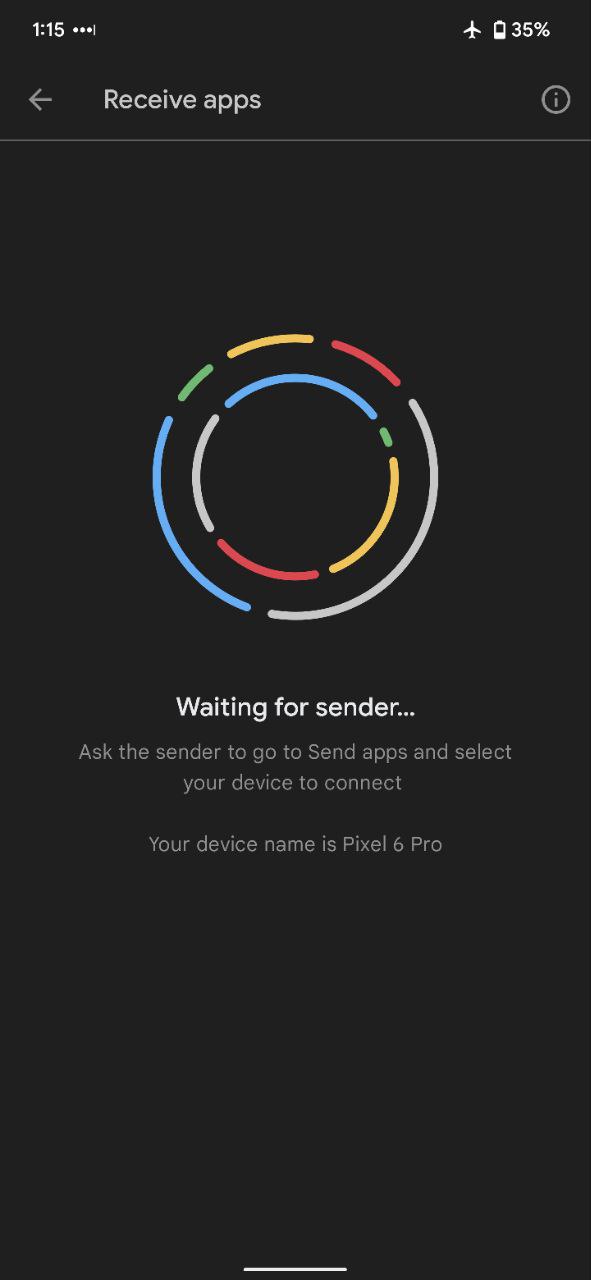
You may want to know how to share the Meshtastic app with other phones in the event you’re somewhere offline or off-grid and want to extend your network. If both your devices are running a recent version of Android it’s fairly straight-forward:
1. Open the Play Store app.
2. Select your user icon in the top right to open the settings menu.
3. Select Manage apps & device.
4. Select Send on the device with the app and Receive on the other.
5. Select Meshatstic from the list and then select the green arrow.
6. Wait for the receiver to appear in and then select them.
Additional Questions
Where can I get support?
You can ask questions and get support for issues over at the Meshtastic forum.
What's the practical range?
T-Beam boards with the stock antenna appear to be capable of at least 11km with an uninterrupted line of sight. (source) This would still vary based on your radio, configuration, and line of sight. This ongoing Practical Range Test Results thread is a good sample of what people are reporting for various devices and scenarios.
How can I update the firmware?
BLE firmware updates through the Android app are coming soon. If you’d like to update the firmware manually via USB, you can find more information here.
Are there plans to commercialize this project?
No, but if some other person/group wanted to use this software and a more customized device we think that would be awesome (as long as they obey the GPL license). (source)
Are there any projects similar to Meshtastic?
Disaster.radio is probably the closest, but focuses on supporting a different set of radios. GoTenna is the most popular commercial solution, but is closed-source, expensive, and recently moved towards developing exclusively for enterprise-level solutions. Many other off-grid commuication solutions also exist, but are still under development.
Where can I learn more about mesh networking?
Ram Ramanathan’s 2018 article Understanding Mesh Networking (Part1 & Part2) is a great place to start. This general post, Introduction to Mesh Technology, provides an overview of some of the most relevant technologies. The darknetplan subreddit is also a good place for news and info on all types of projects.


